180° Thermostat Install
DML FAQ : HOWTO : 180° Thermostat Install
Note: This page documents the install of a 180 degree thermostat in a 1996 Dodge Dakota 318 Magnum with air conditioning. Other model years might be (but probably aren't) different; also if you don't have air conditioning, some steps outlined here aren't nescessary. (Namely, all of the steps involved in moving the generator out of the way in order to get at the thermostat.) Also, I have an open element air cleaner, which means that I don't have the plastic ducting from the grille to the air can. You may want to move that out of the way to make it easier for you to work.
This procedure is basically the same as the one outlined in the 1996 Factory Service Manual. A few other people have been able to change their thermostats with considerably less work. (See the bottom of this page for more info.)
First of all, why would you want to replace a perfectly good thermostat? Well, for a couple of reasons; to reduce pinging and increase power. After I installed my Mopar Performance PCM (computer), I was getting pinging, even with 93 octane. Headers will help in this regard, and so will a cooler thermostat. I needed the thermostat for the pinging, and even if I hadn't, I was going to change it anyway, just for the increased power.
The thermostat has one simple function; to stop engine coolant from flowing below a certain temperature, and to allow it to flow above a certain temperature. This allows an engine to heat up quickly. By blocking the coolant's path to the radiator, it won't cool, therefore it won't cool the engine either, so the engine heats up much more quickly. After operating temperature has been reached (determined by the thermostat), the coolant flows through the radiator and cools the engine. If the coolant drops below the required temperature, the thermostat will close again, and cause the engine to heat up until it has once again reached the proper temperature.
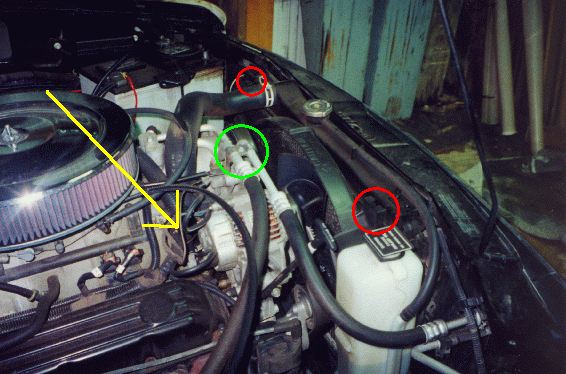
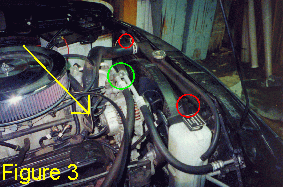
If you look inside your engine bay at the radiator, you will notice a large hose coming off the top of the radiator. This hose bends 90 degrees down, and goes right to the top of the engine. At the end of that hose is the thermostat. (The yellow arrow in Figure 3 is pointing to the approximate location of the thermostat.) Coolant flows up through that hose and into the top of the radiator. There is an easy way to see wether the thermostat is open or shut. While the engine is running, just feel that large hose. (Be careful of any jewelry or loose clothing which might get sucked into the serpentine belt right below the hose!!) It will become warm when the thermostat opens and allows the hot coolant to flow into the radiator.
So, how will a cooler thermostat give you more power? By allowing the coolant to flow at a cooler temperature than the stock thermostat, a replacement thermostat will keep the engine temperature cooler than stock. As we all know, cooler air is more dense and will make more power. Also, by keeping the pistons, heads, cylinder walls, etc. cooler, you will reduce or eliminate "hot spots", which could prematurely ignite the fuel and cause detonation and pinging.
As usual though, there is the law of diminishing marginal returns. If a little cooler is good, a lot cooler is even better, right? Nope. There is a reason for having the thermostat there in the first place. A cold engine isn't any better than a hot engine. There is an allowable range, and we want to be at the coolest end of that range without actually dropping out of it. Fellow DML'er Sean Meldrum informed me that according to some Chrysler technical manuals he was reading, the computer likes to see the engine hit 182 degrees. Any cooler than that might cause a problem and/or generate a trouble code.
The stock thermostat is rated for 195 degrees. We will be replacing that with a thermostat rated for 180 degrees, which is a common exchange for these trucks. Mopar Performance sells a 185 degree version also, I believe. Whatever the value, the install procedure is the same.
This isn't a difficult mod; you just have to remember to put everything back the way you found it and make sure that the only "extra" part left over is the old thermostat. :-) It isn't difficult, but it could be messy; draining the coolant can be something of a pain.
(Click on the pictures to see a 2x version)
Requirements:
- Parts:
- 180 Degree thermostat
- Thermostat gasket
- Coolant (2.5 gallons)
- Distilled Water (2.5 gallons)
- Tools:
- Drain pan or pail (to catch coolant)
- Pliers
- A few flat-head screwdrivers
- A set of various sized sockets and wrenches (1/4", 3/8", 1/2", 9/16", 5/8")
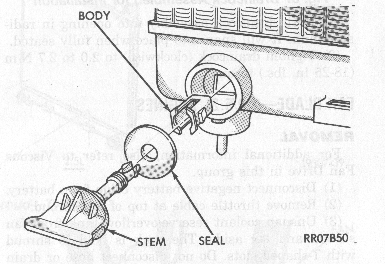
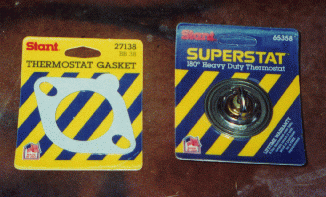
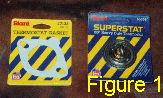 The first thing to do is to make sure that you've got all the tools and parts that you need. (Most of which should be listed in the "requirements" section above.) Figure 1 shows the thermostat and gasket that I used. Both are made by Stant, part numbers 65358 and 27138, respectively. I just went down to the local Parts America and gave them the year, make, model, etc. of my truck and they looked up the appropriate thermostat for my truck. (Make sure that you get one cooler than 195 degrees, or this whole mod will be nothing but a waste of your time.) :-)
Parts America had two versions of the thermostat; normal and "heavy duty". The normal one was about $2.50, and the heavy duty was $5.00. The heavy duty one had a lifetime warrantee and was visibly better constructed than the cheaper version. Throwing caution to the wind, I recklessly splurged on this luxury item. You'll also need a gasket, which set me back an additional $.99. You will NOT be able to use the gasket that is on the truck now; bite the bullet and get the gasket too. As you can see, this is not one of the most expensive mods you can make. :-) Including the distilled water and the coolant, I spent a total of about $21. (A gallon of coolant is about the same price as the thermostat!) You can try to reduce the cost of this mod by saving the coolant that you drain out of the truck. Ha! Good luck! (More on that later.)) (Actually, a few people have done this mod without wasting any coolant at all; if you can do the same, the price of this mod is limited to the thermostat and the gasket alone.)
In order to remove the thermostat, we have to drain the coolant out of the system first. Let the engine cool down. If the coolant is hot or under pressure, you could really do a number on yourself. (Burns, objects being shot at you under pressure, etc.) Make sure that you have plenty of clearance underneath the truck. You will have to crawl around under there to drain coolant and remove some protective panels. Once you start, you won't be able to move the truck until you are done! I used a set of oil change ramps.
- Start the engine and move the heat control lever to full hot, then shut off the engine. (The heater controls won't work without engine vaccum.)
- Disconnect the negative battery cable
- Drain the coolant from the radiator
- Crawl under the truck and remove the plastic piece that is connected to the airdam. In order to do this, you will have to remove four hex screws (1/2") from the frame, and you will have to pop the four plastic "things" which hold the front of this piece and the back of the airdam to the frame. I did it by using a couple of flat head screwdrivers. It is not easy. This is a serious pain in the butt. Be careful though, because those little plastic things seem like they could break easily. If you get really frustrated and feel like spending the money, you could probably get some new ones from your dealer and just rip them out with a pair of pliers or something. Be careful as you take the last one out. I wasn't, and the plastic piece smashed down onto my nose. (Doh!)
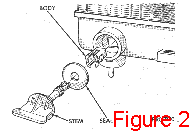
- Find the radiator draincock; if you were laying on your back under the truck with your legs sticking out the front, you would be looking at the back of the radiator. Look in the lower left corner of the radiator, and you will see the plastic draincock. (See Figure 2)
- No tools are required to remove the draincock; position a container under it, and unscrew it by hand (counterclockwise). It will back out somewhat, and coolant may start to dribble out. When it just turns in place and doesn't back out any further, pull on it and it will pop out and allow the coolant to drain. The technical service manual says "DO NOT WASTE reusable coolant. If solution is clean, drain coolant into a clean container for reuse." If your truck is anything like mine, the coolant will flow over a few very dirty parts of the truck before making it into the bucket. I dunno about you, but I sure wouldn't feel comfortable re-using that coolant. Be careful of the coolant as it drains. It will be cold at first, but as the stuff from the upper radiator drains out, it will become warm, and may even be hot.
- Remove the cylinder block drain plugs. (Note: This step might not be nescessary. All you really have to do is drain the coolant down to below the thermostat. I suspect that draining it from the radiator would be sufficient, but since I did not try that, I cannot be certain. I wanted to replace my coolant with a fresh mixture anyway, so I drained all of it.)
Crawl under the truck and look at the engine block. On each side, you will find a small drain plug. (9/16") Remove these drain plugs (I put 2 buckets under the truck and did both at the same time.) On my truck, the one on the right side came out easily, but the one on the left was a real bear. It took quite a bit of tugging and maneuvering before it finally came loose.
Again, the technical service manual said to save the coolant if it was clean, but the coolant coming out of the block was even more erratic than from the radiator. It spilled on everything, and the coolant was anything but clean.
Be very careful when draining the coolant from the block. This coolant will be very hot, even if the truck has been sitting for a while. After a few hours, the coolant in my truck was steaming as it drained into the buckets. It was definitely hot enough to burn.
- Remove the radiator pressure cap.
There is a plastic piece that covers the fan, which the radiator overflow/reserve tank is attached to. I disconnected this which gave me a little more breathing room. In order to do this, you must remove the two metal clips (circled in red in Figure 3) and a 3/8" hex screw. The screw is located about 3/4 of the way down the left side of the radiator. (Not too far away from the draincock.) I also removed the reserve/overflow tank from this plastic piece, which required removing a constant pressure clamp and then sliding the tank up and away from the plastic piece.
You won't actually be able to remove this plastic part from the engine, but now that it is disconnected, you can maneuver it around to give you better access to various parts of the engine.
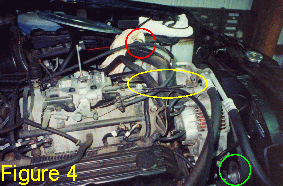
Remove the constant pressure clamp from the upper radiator hose and slide the hose off of the radiator. The technical service manual says to use a special tool to release the clamp, but I found that a pair of pliers set to a wide grip worked just fine. In order to get the hose out of the way, I used a piece of twine to tie it back to the positive battery cable. It was leaking a little bit, so I stuffed a towel into the end of it. (Circled in red in Figure 4)
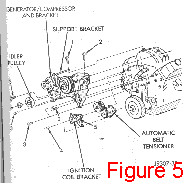
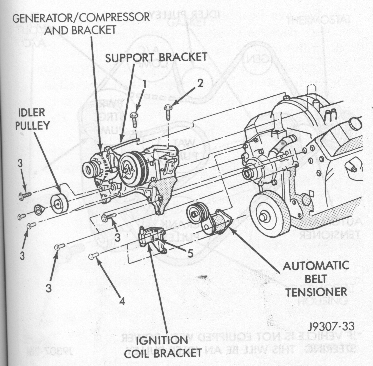
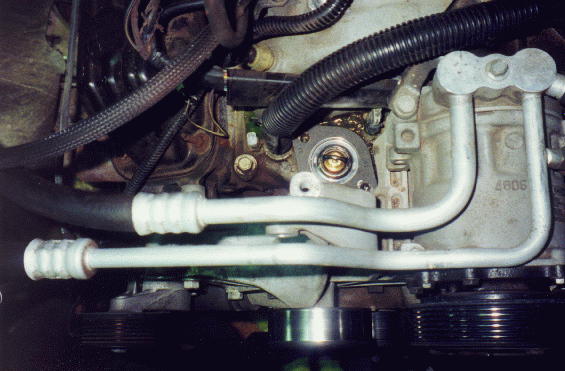
- Remove the support bracket (Circled in yellow in Figure 4; also see Figure 5) which runs from the intake manifold (on top of the engine) to the generator. You will probably have to remove your air cleaner can in order to gain access to the bolt on the manifold side. As you can see from Figure 4, I have removed the top portion and the element of my air can, and rested the whole base over on the left side of the engine. (With the breather hose still attached.)
- Now we must remove the serpentine belt.
- Find the automatic belt tensioner (circled in green in Figure 4; also see Figure 5)
- Attach a socket or a wrench (5/8") to the bolt on the automatic belt tensioner and rotate it clockwise. The bolt itself won't turn, but the entire pulley will move to the right and cause the serpentine belt to go slack.
- Pull the serpentine belt off of a couple of pulleys and then relax the pressure on the automatic belt tensioner. Let the serpentine belt hang; there's no reason to remove it from the engine; just keep it out of the way.
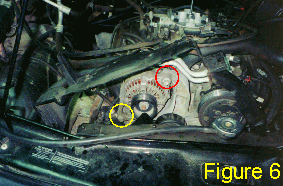
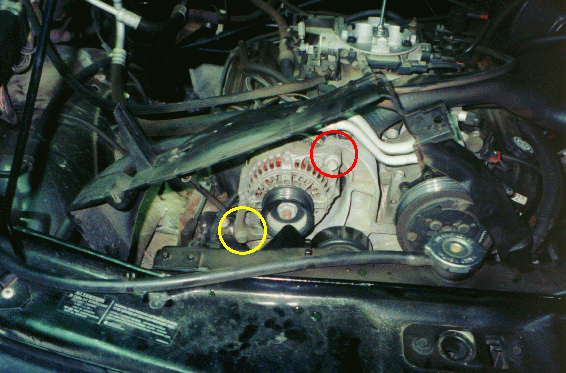
- Remove the two generator mounting bolts (9/16") (in Figure 6, the top bolt is circled in red, the lower bolt in yellow). The top bolt just unscrews, but the lower bolt has a nut on it.
- Unbolt (1/2") the dipstick from the base of the generator.
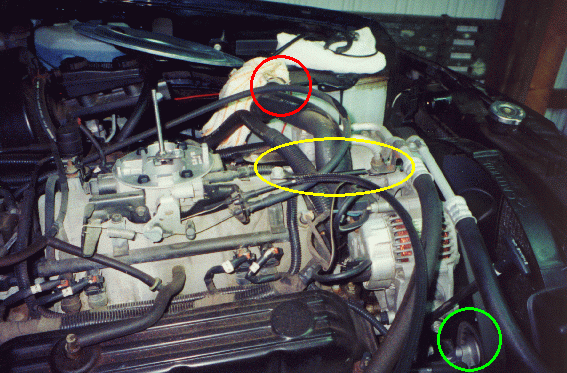
- I unbolted (1/4") and removed the clamp (circled in green in Figure 3) on the air conditioning hoses in order to give me some additional room to get the generator out of the way. The hoses didn't move very much, but they did move a little after I removed the clamp, which made it easier to swing the generator out of the way.
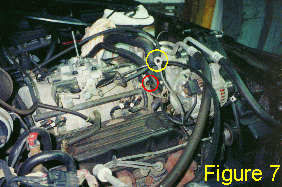
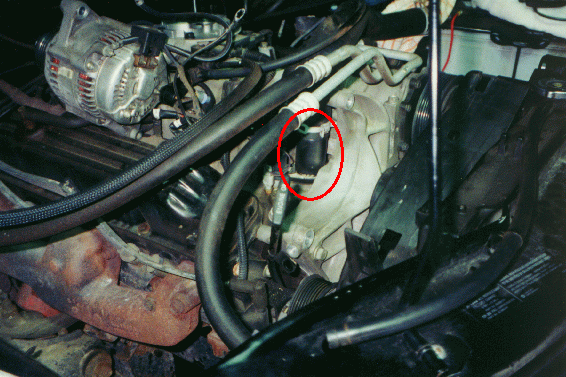
- There was an electrical wire running from the generator which plugged into the engine. It was kind of short, so I unplugged it to give me more options for repositioning the generator. (The place where it plugs into the engine is circled in red in Figure 7. Circled in yellow in Figure 7 is a wire that was attached to the generator side of the generator support bracket, underneath the clamp that was removed in the previous step.)
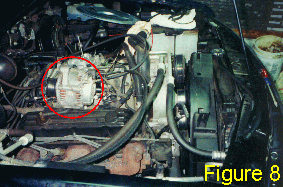
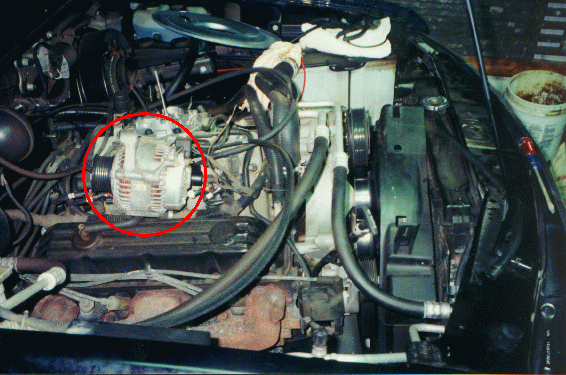
- Now you can remove the generator, and swing it out of the way. I moved it back and rested it on the right valve cover, as seen in Figure 8. (The generator is circled in red.)
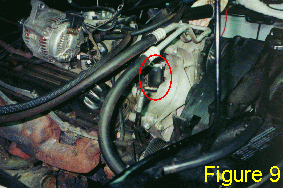
- At this point, you should be able to see where the upper radiator hose meets the engine. (Circled in red in Figure 9). This is where the thermostat housing is located.
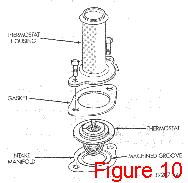
- The technical service manual says to remove the upper radiator hose from the thermostat housing, but the constant tension clamp on there was a pain to remove (I finally did get it), and the hose itself was very securely fastened to the thermostat housing. I just unbolted the housing without ever removing the hose. The housing is shown in Figure 10. (Along with the gasket and the thermostat.)
- Unbolt the thermostat housing (two 1/2" bolts, as seen in Figure 10), and remove it. I was going to remove the electrical plug and the heater hose next to the thermostat housing, but I started in on it, and it seemed to be more trouble than it was worth. You can remove and replace the thermostat housing if you maneuver it right.
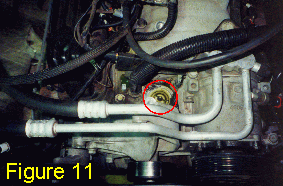
- At this point, you should see something similar to Figure 11. What you are looking at is the thermostat. Scrape whatever is left of the old gasket off of the engine and the bottom of the thermostat housing. Leave the old thermostat in while scraping off the gasket; this will prevent pieces of the gasket from falling into the engine.
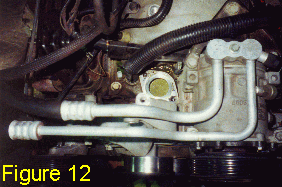
- Now, you can remove the old thermostat, as shown in Figure 12.
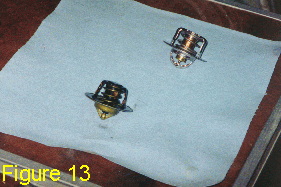
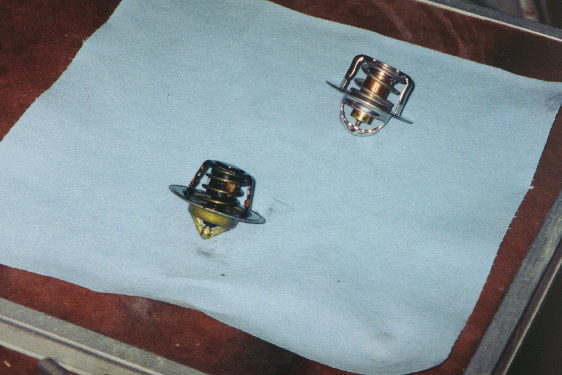
- Figure 13 is just me wasting film, comparing the new (top right) and the old (bottom left) thermostats. The new thermostat has a nice chrome finish. Too bad nobody will ever get to see it. :-)
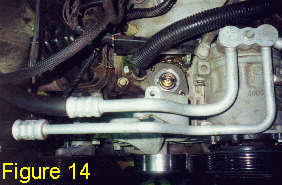
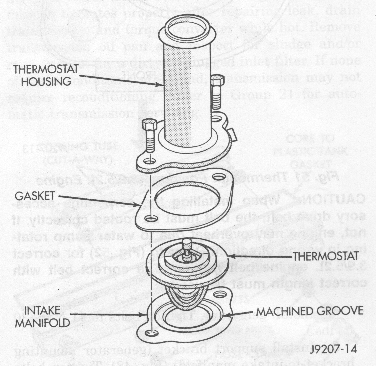
- Place the new thermostat into the machined groove and put the gasket into position on top of it as shown in Figure 14. The gasket will probably have an adhesive on it which will help to hold it in place while you bolt in the housing.
- When you replace the housing, make sure you put it in the right way. There is a little tab on it that says "FRONT". That tab should face the front of the engine.
- Now, you're basically looking at reversing everything you have done up to this point. Put the generator back where it was. (I found that tapping on the lower mount with a hammer helped to align it so that the bolt could be put in.) According to the technical service manual, the generator mounting bolts should be torqued to 30 ft-lbs. Reconnect the electrical wire to the engine, bolt the dipstick back into place, replace the air compressor hose clamp, the generator support bracket, etc. The technical service manual says to tighten the bolts on the generator bracket to 40 ft-lbs.
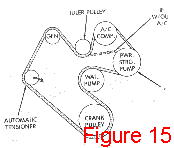
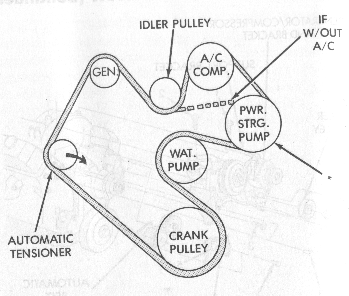
- Now replace the serpentine belt. The technical service manual says to route it around all the pulleys except the idler pulley, and then rotate the automatic tensioner clockwise, and slip the belt onto the idler pulley. I found it easier to leave the air conditioning compressor pulley as the last one. However you do it, make sure that you route the belt correctly! Bad things could happen if you don't, one of which is the water pump overheating due to it spinning in the wrong direction. The proper routing (starting with the automatic tensioner, and working counter-clockwise) is as follows: (also see Figure 15)
- to the LEFT of the automatic tensioner,
- UNDER and to the RIGHT the crank pulley,
- to the LEFT of the water pump pulley,
- UNDER and to the RIGHT of the power steering pump pulley,
- to the RIGHT and OVER the air conditioning compressor pulley,
- UNDER the idler pulley, and
- OVER the generator pulley
Make sure that the serpentine belt is properly seated on all of the pulleys.
- Replace anything else you removed from the engine, such as the overflow/reserve tank, that plastic protective piece over the fan, the upper radiator hose, your air cleaner, etc. At this point, I would hold off on replacing the plastic protective thing underneath the truck until you are sure that there are no leaks.
- Now we have to re-fill the cooling system with a 50/50 mixture of water and antifreeze. The less minerals in the water, the better. I bought a few gallons of distilled water at Wal-Mart for less than $.60 a gallon. (They have two types of distilled water. One version has calcium added for taste. You don't want that one. Anyway, the pure stuff is cheaper.)
- Replace the cylinder block drain plugs
- Replace the radiator draincock.
- Pour the mixture into the top of the radiator until the system is full. (You will probably have to stop several times to allow the coolant to drain down into the engine.) Once the radiator is full and won't accept any more coolant, fill the reserve/overflow tank up to the "FULL" mark. Replace both caps.
- Look under the truck and check for leaks. Also check around the area of the thermostat, and around any hoses that you removed.
- Start up the engine and let it run until the thermostat opens. (You will know when the thermostat opens because the upper radiator hose will become warm. While the engine is running and you are waiting for it to heat up (it will take several minutes), check under the truck for leaks and also around the thermostat & hoses. Be very careful of the spinning serpentine belt, the pulleys, and the fan!!! While the truck was running, I backed it off of the ramps so that it would sit level. I don't know if this makes any difference at all, but I felt more comforatable with the truck sitting level.
- Once the thermostat opens, you will want to check again for leaks.
- If there are no leaks, you can replace the protective plastic thing underneath the truck. Those stupid plastic things that hold it and the back of the airdam in place are only slightly less of a pain to install than they were to remove.
- If nescessary, add coolant to the reserve/overflow tank to bring the level up between the "ADD" and "FULL" marks. My truck took exactly 4 gallons. After a few warm up and cool down cycles, you will probably have to add more coolant to keep the level above the "ADD" mark. My truck ended up taking a total of about 5 gallons of coolant. 4 during the initial install, and 1 more over a period of 2 or 3 days.

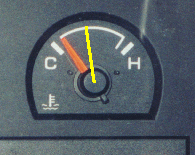
- Figure 16 at the right shows what my water temperature guage indicates at normal operating temperature after the 180 degree thermostat install. The yellow line shows approximately where the needle used to sit prior to the install. This thermostat completely eliminated all of the pinging that was introduced by the Mopar Performance PCM and gave me some extra power to boot. (And increased engine life and reliability, no doubt.) This mod doesn't quite have the horsepower to dollars ratio as nitrous, but its a really cheap, fairly easy way to get some extra power. And hey, who can't use a little more of that?!? :-)
Note: Shortly after I did this write-up, I received a message from David Zavetsky (zavetsky@usaor.net) who said:
"I did my thermostat a few months back and found that I could avoid having to remove the alternator and the mount. By using a really long screwdriver, I was able to get to the return hose clamp by sneaking in through the opening in the bracket on thge side......Then, I could remove the bolts for the thermostat housing, pull it up off the engine and then remove the thermostat that way. Saves a lot of extra work."
Note 2: Sean Meldrum (spm@c3net.net) was able to change his thermostat without spilling a drop by using a cheap gas siphon to pump the coolant out of the radiator and the hose running to the thermostat into a clean milk jug. If you're not planning to replace all or part of your coolant, this might be a good way to go.
Note 3: Dewayne Blanco (dblanco@stdauto.com) said:
"I recently replaced my thermostat without removing anything but the hose from the radiator; using a long extension I unbolted the thermostat housing then removed it and the hose (with the god-forsaken clamp in place) in 10 minutes! Cleaning off the old gasket was not too bad, with a long large flat blade screwdriver...entire job took 30 minutes. Hope this is another alternative for someone who hates stupid clamps in inaccessible locations..."
Note 4: Ray Block (bpracing@worldnet.att.net) added the following tips:
- You don't have to remove that plastic shield beneath the radiator unless you want to capture/save the coolant. I can open the radiator drain from above and just spray the coolant off the shield when I'm done.
- It's not necessary to remove the block drain plugs unless you want to flush the entire system.
- I replaced the drain plug with a petcock on the passenger side. There wasn't enough clearance on the driver's side. Future draining will be quicker/easier.
- There's no need (on mine) to remove the support bracket. I loosen the end at the alternator and remove the bolt at the manifold end. Then just swing it aside.
- I did not find it necessary to remove the alternator. I loosened the lower bolt/nut and removed the upper bolt. Then just swing the alternator to the left, reinstall the bolt through the mounting bracket and let the alternator rest against it. Gave enough clearance on mine. Did not have to disconnect any wires either.
- As suggested in some other posts, the "Front" tab can be ground off to make future TS changes easier.
Contributed by: Jon Steiger, David Zavetsky, Sean Meldrum, Dewayne Blaco, Ray Block
Last updated: Mon Jul 21 20:55:37 2003
 The first thing to do is to make sure that you've got all the tools and parts that you need. (Most of which should be listed in the "requirements" section above.) Figure 1 shows the thermostat and gasket that I used. Both are made by Stant, part numbers 65358 and 27138, respectively. I just went down to the local Parts America and gave them the year, make, model, etc. of my truck and they looked up the appropriate thermostat for my truck. (Make sure that you get one cooler than 195 degrees, or this whole mod will be nothing but a waste of your time.) :-)